
Overview:
This guide covers four things:
- How canonical URLs and multilingual sitemaps work for a site translated by Bablic, and where to host the sitemaps.
- How to import a sitemap into the Bablic dashboard.
- How to queue URLs for flattening.
- How to submit your multilingual sitemap to Google Search Console and request a crawl.
What is Flattening?
Flattening is Bablic’s process for making translated pages crawlable. A headless browser loads each page, applies the translation, and saves the finished HTML. Search engines are then served that saved HTML. They don’t have to run JavaScript to see the translated content. All examples use a site deployed on language subdomains:
| Language | Host | Role |
|---|---|---|
| English (source) | https://www.example.com |
Origin site, x-default |
| Spanish | https://es.example.com |
Bablic-translated |
| German | https://de.example.com |
Bablic-translated |
1. Canonical URLs by language and multilingual sitemaps
Canonicals: every language version is its own canonical
Each translated page must point its canonical tag at itself, not back to the English page. A Spanish page that canonicalizes to www tells Google “don’t index me”. Your translations would then never appear in search.
The About page should carry these tags in all three versions:
<!-- On https://es.example.com/about -->
<link rel="canonical" href="https://es.example.com/about" />
<link rel="alternate" hreflang="en" href="https://www.example.com/about" />
<link rel="alternate" hreflang="es" href="https://es.example.com/about" />
<link rel="alternate" hreflang="de" href="https://de.example.com/about" />
<link rel="alternate" hreflang="x-default" href="https://www.example.com/about" />
Rules to follow:
- Self-referencing canonical on every language version:
www→www,es→es,de→de. - Reciprocal hreflang. Every version lists every other version and itself. If
espoints tode, thendemust point back toes. x-defaultpoints to the version for users whose language you don’t serve. That’s usually the source site.- Same path across languages.
/aboutonwwwmaps to/aboutonesandde. The Bablic script writes the self-referencing canonical and the hreflang tags on translated pages, and flattening captures them in the saved HTML. You only need to make sure your origin (English) pages don’t hard-code a canonical that will be wrong once they’re translated.
Multilingual sitemaps
A multilingual sitemap lists each page once and declares its language alternates with <xhtml:link> elements. Google treats this the same as hreflang tags in the page <head>. Using both is fine as long as they agree.
Source sitemap (what most sites already have, English only):
<?xml version="1.0" encoding="UTF-8"?>
<urlset xmlns="http://www.sitemaps.org/schemas/sitemap/0.9">
  <url><loc>https://www.example.com/</loc></url>
  <url><loc>https://www.example.com/about</loc></url>
</urlset>
Multilingual sitemap (every language version has its own <url> entry, each listing all alternates):
<?xml version="1.0" encoding="UTF-8"?>
<urlset xmlns="http://www.sitemaps.org/schemas/sitemap/0.9"
        xmlns:xhtml="http://www.w3.org/1999/xhtml">
  <url>
    <loc>https://www.example.com/about</loc>
    <xhtml:link rel="alternate" hreflang="en" href="https://www.example.com/about"/>
    <xhtml:link rel="alternate" hreflang="es" href="https://es.example.com/about"/>
    <xhtml:link rel="alternate" hreflang="de" href="https://de.example.com/about"/>
    <xhtml:link rel="alternate" hreflang="x-default" href="https://www.example.com/about"/>
  </url>
  <url>
    <loc>https://es.example.com/about</loc>
    <xhtml:link rel="alternate" hreflang="en" href="https://www.example.com/about"/>
    <xhtml:link rel="alternate" hreflang="es" href="https://es.example.com/about"/>
    <xhtml:link rel="alternate" hreflang="de" href="https://de.example.com/about"/>
    <xhtml:link rel="alternate" hreflang="x-default" href="https://www.example.com/about"/>
  </url>
  <url>
    <loc>https://de.example.com/about</loc>
    <xhtml:link rel="alternate" hreflang="en" href="https://www.example.com/about"/>
    <xhtml:link rel="alternate" hreflang="es" href="https://es.example.com/about"/>
    <xhtml:link rel="alternate" hreflang="de" href="https://de.example.com/about"/>
    <xhtml:link rel="alternate" hreflang="x-default" href="https://www.example.com/about"/>
  </url>
</urlset>
Don’t forget xmlns:xhtml . The <urlset> tag must declare xmlns:xhtml="http://www.w3.org/1999/xhtml". Without it the file is invalid XML, and both Google and the Bablic importer will reject it. The Bablic dashboard can build this file from your source sitemap for you. See Generate a multilingual sitemap in section 2.
Where to host the sitemaps
Host the sitemap files on the origin site and point to them from the origin’s robots.txt:
https://www.example.com/sitemap.xml                 <- your existing source sitemap
https://www.example.com/sitemap-multilingual.xml    <- multilingual sitemap (www + es + de)
# https://www.example.com/robots.txt
User-agent: *
Allow: /
Sitemap: https://www.example.com/sitemap-multilingual.xml
A sitemap on www.example.com may list URLs on es.example.com and de.example.com, but only if Google knows you own all three hosts. The simplest way is to verify a Domain property (example.com) in Search Console, which covers every subdomain. See section 4.
On a large site, split the multilingual sitemap (Google allows 50,000 URLs or 50 MB per file) and list the parts in a sitemap index on the origin:
<?xml version="1.0" encoding="UTF-8"?>
<sitemapindex xmlns="http://www.sitemaps.org/schemas/sitemap/0.9">
  <sitemap><loc>https://www.example.com/sitemap-multilingual-1.xml</loc></sitemap>
  <sitemap><loc>https://www.example.com/sitemap-multilingual-2.xml</loc></sitemap>
</sitemapindex>
2. Import a sitemap in the Bablic dashboard
Importing a sitemap adds its pages to your project’s Flattened URLs list, so Bablic knows which pages to flatten.
The screenshots come from a demo project that uses language folders (/es/, /de/). The screens and steps are the same for a subdomain project. Only the URLs Bablic generates differ (es.example.com/... instead of www.example.com/es/...).
Step 1: Open Flattened URLs
- Sign in at dashboard.bablic.com and select your project from the top-left project switcher.
- In the left menu, choose Flattening → Flattened URLs.
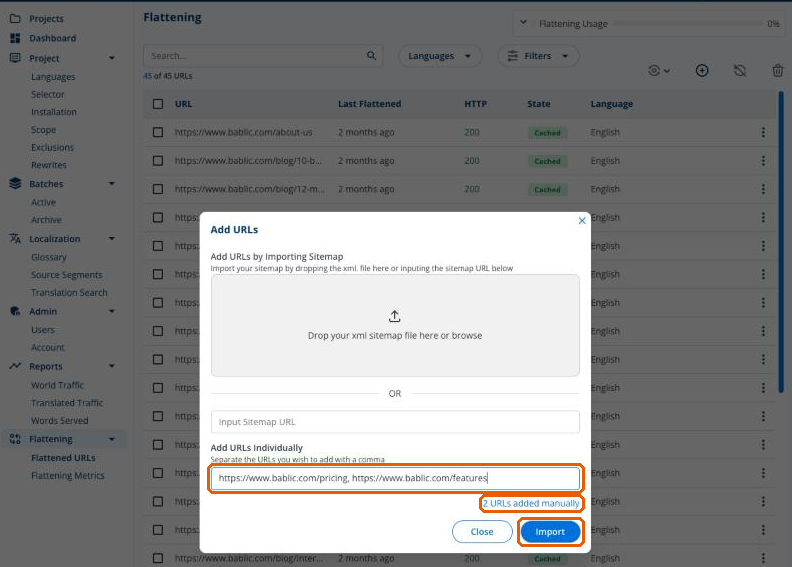
- Click the ⊕ (Add URLs) button above the table, on the right.
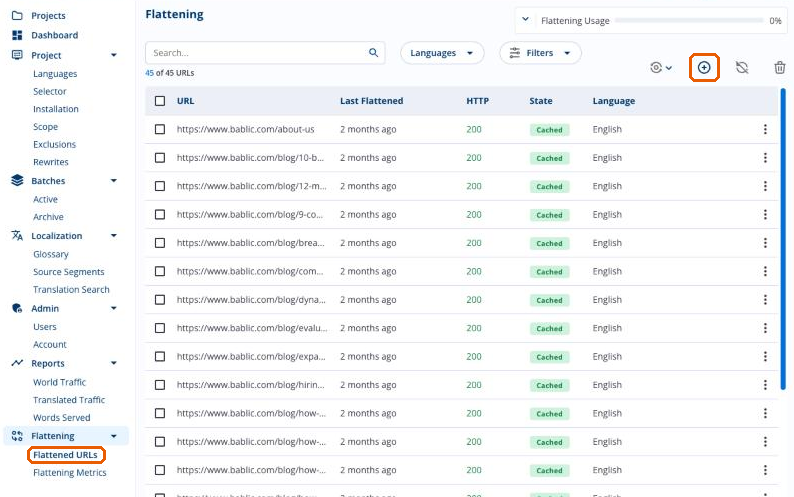 The table lists every URL in the project, with columns for when it was last flattened, the HTTP status, its state, and its language.
Step 2: Paste your sitemap URL
The Add URLs dialog gives you three ways to add pages:
- Drop your xml sitemap file here or browse: upload a sitemap file from your computer.
- Input Sitemap URL: paste the address of a sitemap hosted on your site.
- Add URLs Individually: paste one or more page URLs (covered in section 3).
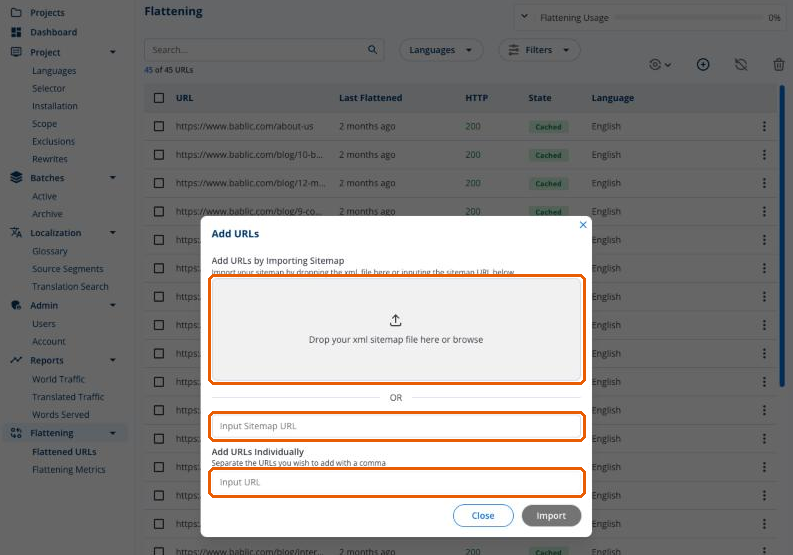 Copy your sitemap’s address from your browser’s address bar, for example
https://www.example.com/sitemap.xml, and paste it into Input Sitemap URL. Bablic reads the file as soon as you paste it. If the file is a plain (English-only) sitemap, Bablic says “This sitemap appears to be a source sitemap” and offers a Generate Multilingual Sitemap button: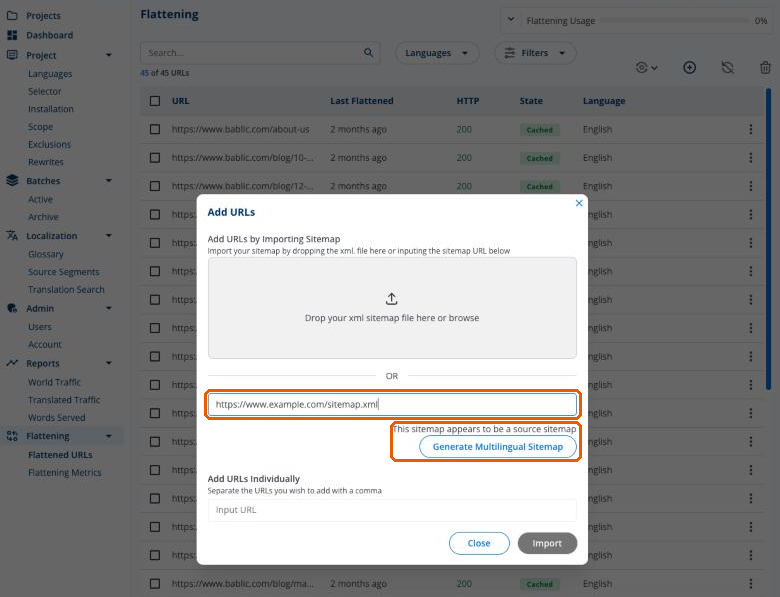
Generate a multilingual sitemap (optional)
Click Generate Multilingual Sitemap. Bablic takes every page in your source sitemap and adds the matching URL for each of your project’s languages, using your project’s deployment method (subdomains in our example). It then reports how many URLs it found. In the demo, 8 source pages × 10 languages = 80 URLs.
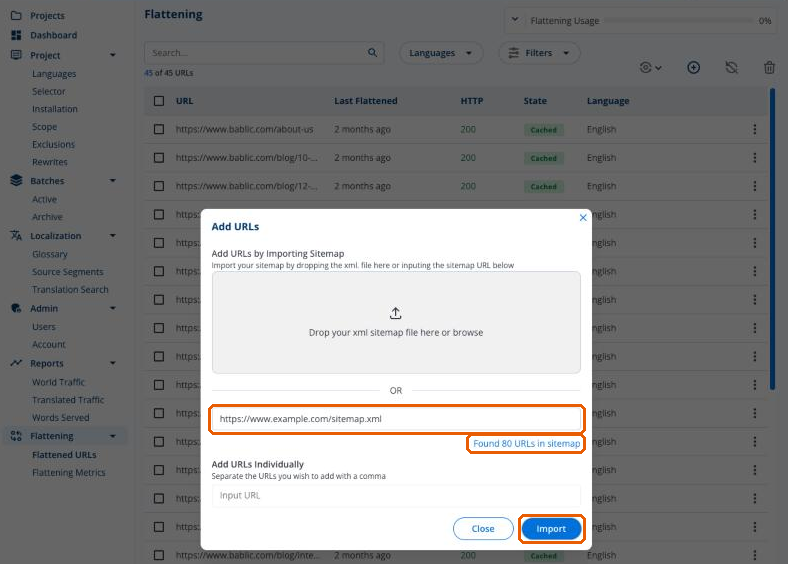
Step 3: Import
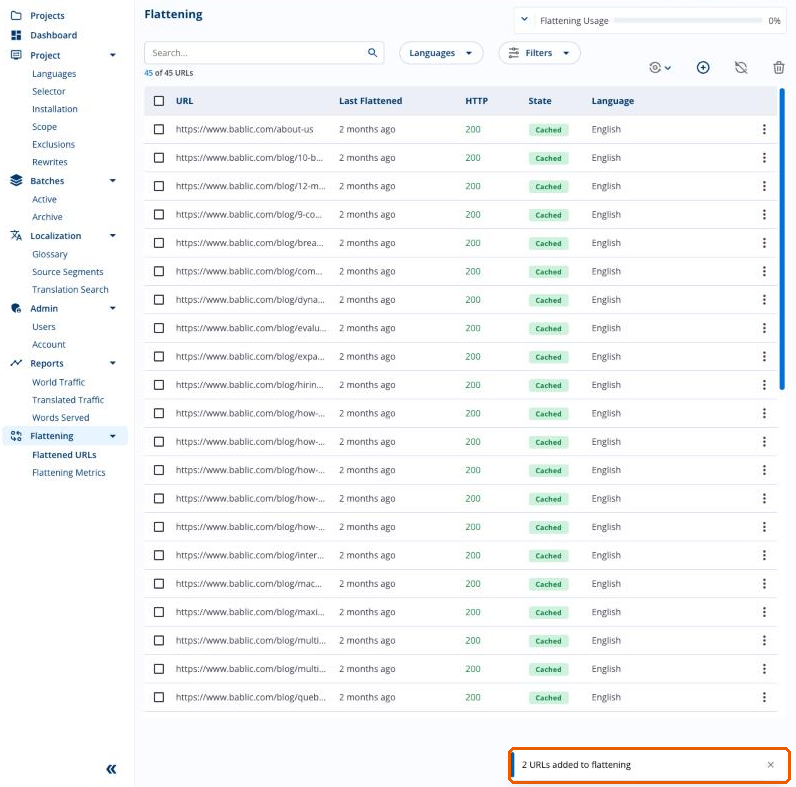
Click Import. A confirmation appears in the lower-right corner, and the URLs are added to the Flattened URLs list. Pages that are already in the list are not duplicated.
“Failed to analyze sitemap: TypeError: Failed to fetch”
The dashboard downloads your sitemap directly in your browser. Many web servers block that kind of cross-site request, which causes this error. Open the sitemap URL in a new tab, save the file (File → Save Page As…, or right-click → Save As), then drag the saved .xml file onto the Drop your xml sitemap file here area.
3. Queue URLs for flattening
A URL in the list is only flattened, or re-flattened, when it’s queued. Queue pages after you add them, and again whenever their content or translations change.
URL states
| State | Meaning |
|---|---|
| Queued | Waiting for the flattening service to pick it up. |
| Cached | Flattened. The saved HTML is what search engines are served. |
| (other states) | Use Filters → State to see every state in your project. |
Option A: Add new page URLs and queue them
- Click ⊕ (Add URLs).
- Under Add URLs Individually, paste one or more page URLs, separated by commas:
https://www.example.com/pricing, https://www.example.com/features - Bablic confirms how many it recognized (“2 URLs added manually”). Click Import.
 Enter the source-language (origin) URL, for example
https://www.example.com/pricing. Bablic produces the translated versions for each of your languages.
Option B: Queue a single URL
Click the ⋮ menu at the end of any row and choose Queue URL.
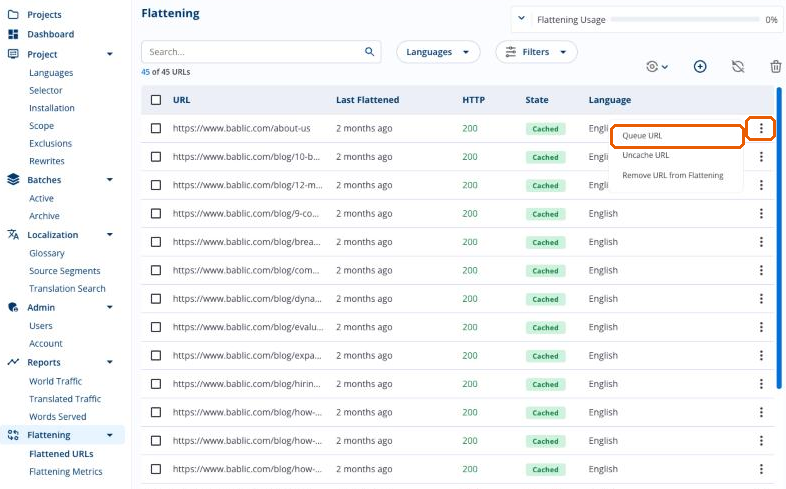
The same menu also has:
- Uncache URL: discards the saved flattened copy.
- Remove URL from Flattening: takes the URL out of the list entirely.
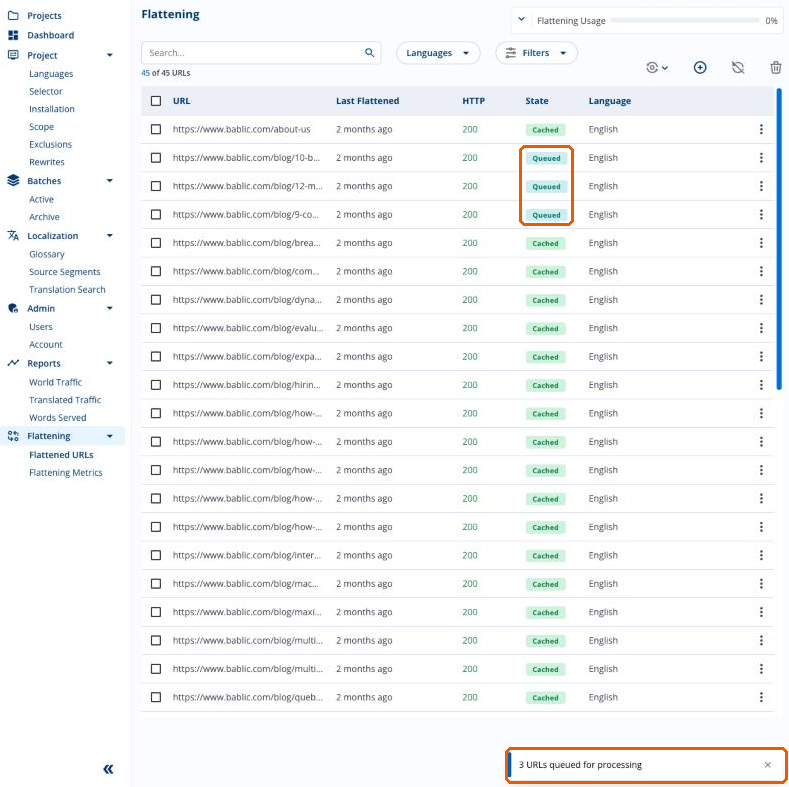
Option C: Queue several URLs at once
- Tick the checkboxes next to the URLs you want. Use the header checkbox to select every row on the page.
- Click the Queue button (eye icon) in the toolbar.
- Click Confirm in the Queue URLs dialog.
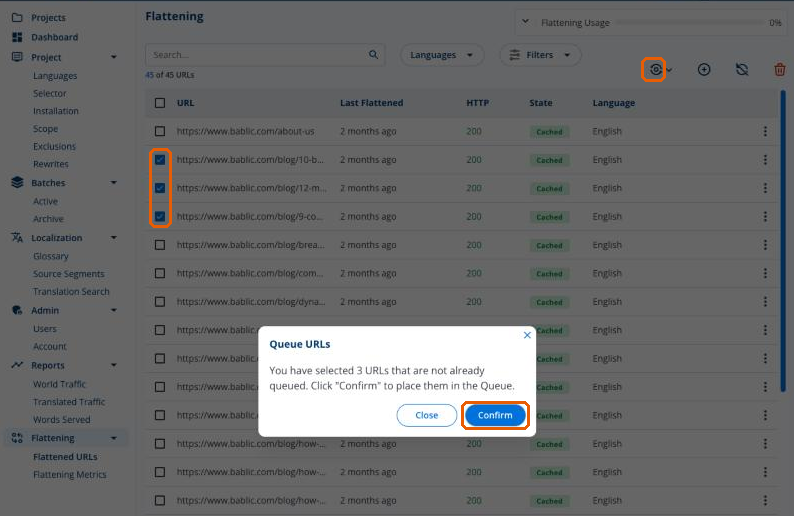 The selected rows change to Queued, and a confirmation appears:
Option D: Queue by category
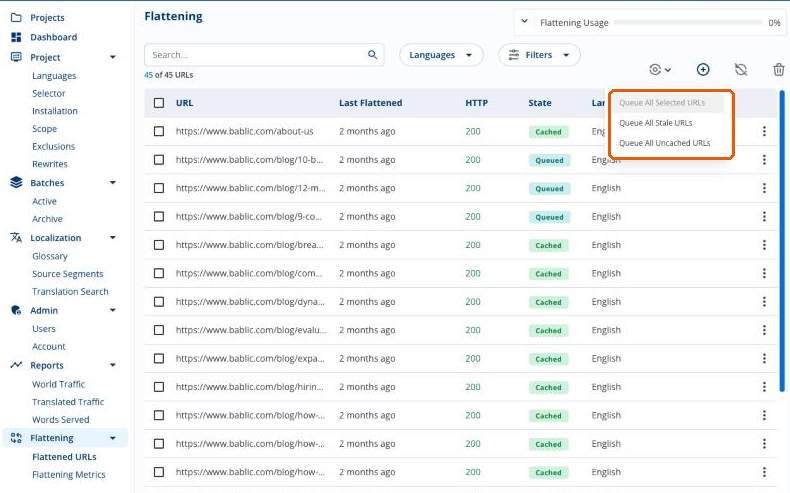
Open the ▾ arrow next to the Queue button for bulk options that don’t require selecting rows:
- Queue All Selected URLs: same as option C.
- Queue All Stale URLs: re-queue pages whose flattened copy is out of date.
- Queue All Uncached URLs: queue every page that has never been flattened, for example right after a sitemap import.
Monitoring progress
- Filters narrows the list by State, HTTP Status (e.g.
404, 500), and Last Date Rendered. - Languages filters the list by language.
- Flattening Usage (top right) shows how much of your plan’s flattening allowance you’ve used.
- Flattening → Flattening Metrics has reporting on your project’s flattening activity.
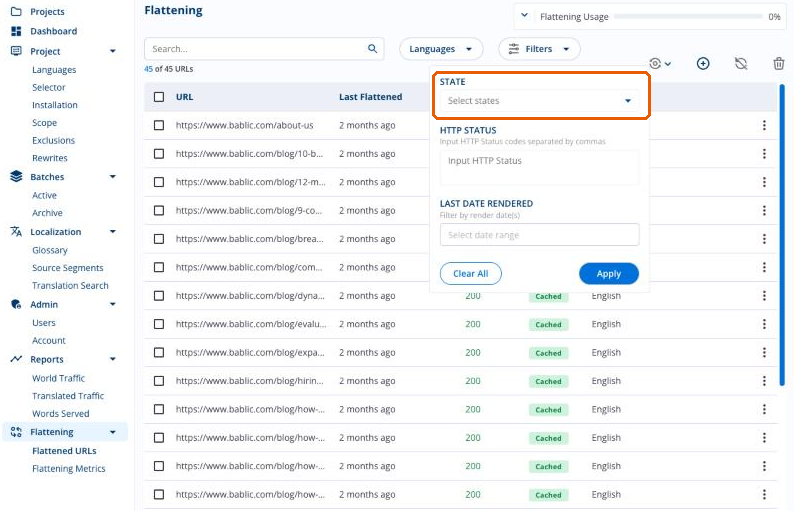 Tip: After a large import, filter for HTTP status codes other than 200. That catches redirects, 404s, or pages blocked by your firewall. If your site restricts bot traffic, ask Bablic support for the flattening service’s IP addresses so you can allowlist them.
4. Submit your multilingual sitemap to Google Search Console and request a crawl
Step 1: Verify a Domain property
- Go to Google Search Console and open the property selector → Add property.
- Choose Domain (not URL prefix) and enter
example.com. - Add the TXT record Google gives you at your DNS provider, then click Verify. A Domain property covers
www.example.com,es.example.com,de.example.com, and any future language subdomain. That’s what allows one sitemap onwwwto list URLs on all of them. If you already use separate URL-prefix properties (https://www.example.com/,https://es.example.com/,https://de.example.com/), that also works, as long as the same Google account is a verified owner of all of them.
Step 2: Submit the sitemap
- Select the
example.comproperty. - In the left menu, choose Indexing → Sitemaps.
- Under Add a new sitemap, enter the full sitemap URL:
https://www.example.com/sitemap-multilingual.xml. - Click Submit. Within a few minutes to a few hours, the Submitted sitemaps table should show Status: Success and a count of Discovered pages. If it shows Couldn’t fetch or Has errors, open the row for details. The usual causes are a missing
xmlns:xhtmldeclaration, URLs on a host you haven’t verified, or a sitemap blocked byrobots.txt. Resubmit the sitemap whenever you add a language or a large batch of pages.
Step 3: Request a crawl of key pages
Submitting a sitemap tells Google the pages exist. To push specific high-value pages, such as your translated home pages, to the front of the line:
- Paste the page URL, e.g.
https://es.example.com/, into the URL Inspection bar at the top of Search Console. - When the report loads, click Request Indexing.
- Repeat for
https://de.example.com/and any other priority pages.Google limits how many indexing requests each property can make per day, so save these for your most important pages and let the sitemap handle the rest.
Step 4: Confirm hreflang is being picked up
After Google recrawls, run URL Inspection on a translated page and click View crawled page. In the HTML, check that:
- The page content is in the right language. This confirms Google received the flattened page.
- The
<link rel="canonical">points to the page’s own URL. - The
hreflangalternates foren,es,de, andx-defaultare present.Also check Indexing → Pages over the following weeks. Translated URLs should move from Discovered – currently not indexed to Indexed.
Quick checklist
- Every language version has a self-referencing canonical.
- hreflang is reciprocal and includes
x-default. - The multilingual sitemap declares
xmlns:xhtmland lists every language URL. - The sitemap is hosted on
www.example.comand referenced fromrobots.txt. - The sitemap is imported in the Bablic dashboard (Flattening → Flattened URLs → ⊕).
- URLs are queued and showing Cached.
- A Domain property for
example.comis verified in Search Console. - The sitemap is submitted and shows Success.
- Indexing has been requested for the translated home pages.